MikroTik Wireless Scan

In this lesson, I will explain the usage of the MikroTik Wireless Scan which is a new tool that can be used on the wireless.

When we spoke about the wireless alignment, the idea was to align to the right AP. Now the idea is to connect the station to the Wireless AP so it can receive the wireless service that it is provided.

The idea is just very simple: whenever you have an Access Point router that is propagating wireless service, and you have another MikroTik router that needs to connect to that AP, then you can use the scan tool to find the right SSID and connect to it. While doing that, the Station will add the right frequency that the AP is propagating its service on it without you do it manually.

To make it more clear for you, let’s check the scenario that I have below:

R1 is the AP. He is connected to the internet on its interface R1 and providing wireless service, so any one who is connected to R1 wirelessly he can get internet service.

The goal is to make R2 as a station to R1. To do that, we should have the complete information from R1 wireless config such as frequency, SSID, wireless password, etc….

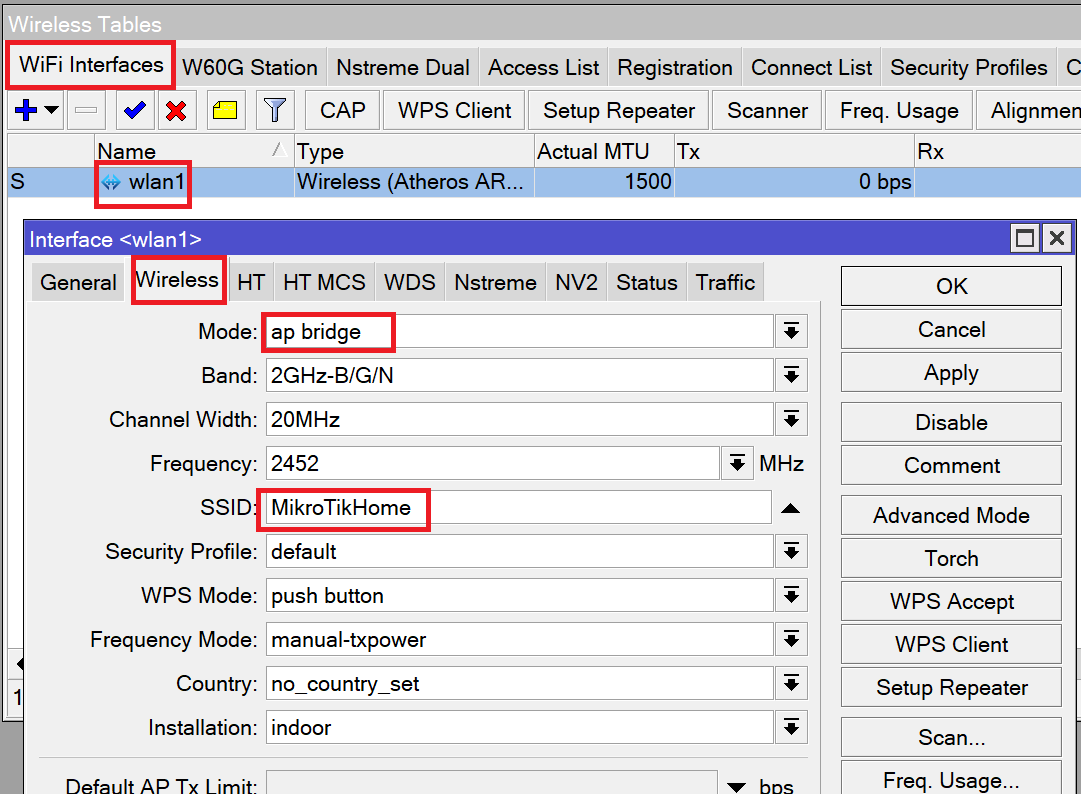
Before I start working on R2, let me show you what we have on R1:

As you see, R1 is an AP bridge using the frequency 2452 MHz and SSID MikroTikHome. I don’t have a password on this AP just as being a LAB (in a production network, please always put a password on your wireless).

Let’s ping from R1 to the google.com to know if R1 is connected to the internet:

The ping is working and R1 is connected to the internet.

Now we have to start working on R2. I could take from R1 the Frequency and SSID and add it manualy on the wireless configuration of R2 to connect to it, but that’s a lot of work right?

Instead, I will be using the scan tool to scan what wireless networks are available in my environment and connect to the one provided by R1 which has MikroTikHome SSID.

You can reach to the scan tool from 2 different places. Whether from the tab on the global wireless configuration as you see below:

Or you go inside the wireless interface and you can see the scan tool on the right side:

I will click on it, and let’s start the scan:

Here after scanning, I can see the R1 AP which is has the SSID of MikroTik Home. You can see also it has labelled it as ARB which means an Access Point RouterBoard. When you see AP, this means that it is an AP but not a MikroTik brand.

I will connect to it now using the Connect Tab:

Once done I see that the full information such as Frequency and SSID are added to R2 WLAN1 configuration as you see below:

I will only have to put the Mode as Station and click ok then see if R2 will become a station to R1. Let’s do that:

Here I have clicked on ok. Let’s see if wireless link has worked:

Indeed it is working because I have an “R” which means running. To be sure that R2 has been associated by R1 which is the AP, I can go to R1 and check the registration table and see if R2 is shown there:

I see that the station which has the MAC address DC:2C:6E:40:40:1A is a station to R1. Let’s check if this is the MAC address of the Wireless Radio of R2:

Indeed it is 🙂

That’s all what I wanted to show you in this lesson, I hope you enjoyed it and see you in the upcoming one.

0 Comments

Submit a Comment

Your email address will not be published. Required fields are marked *


The reCAPTCHA verification period has expired. Please reload the page.

Please Login to Reply or add a comment!

About