In this lesson, I will explain another Wireless Tool that can be used which is the Sniffer tool. As you may know, Sniffer is to capture frame and to check them in a capturing software like Wireshark. This is something that also hackers do it when they want to hack a network.
On Wireless, you are sniffing layer 2 frame and not packets. On MikroTik RouterOS v7, you can sniff Layer 3 packets if you want by going to Tools as following:

As you see, it is clearly mentionning that this is a Packet Sniffer. However, on wireless, the tool is totally different. It is a special sniffing tool for Wireless, so Layer 2 frames.
Let’s do an experiement now: I will enable the wireless sniffing to capture the wireless Layer 2 frames, then I will put the saved sniffing file in Wireshark to see the output of the sniffing content. Let’s 1st start by doing the sniffing:

From Wireless I only need to click on Sniff. After doing that, I will have an box open where I can start the sniffing. I will click on Start and leave it for 30 seconds to Sniff the Wireless Frames:

Here I am done. I have already sniffed enough of Frames. From this level, you can check the output of the frames on the MikroTik Router by check clicking on Sniffed Packets. Let’s do that:

Here you can see the information. Everything you see here is related to the wireless management frames like beacon, RTS, CTS, Proble request, Probe response, etc…. (Do not worry about those terms, we will cover most of them in this course in later chapters).
However, those sniffed packets are not saved forever on the MikroTik router. In case you need to keep a saved copy, then you can compile them in a file. Let’s save those sniffed frames in a file:

All you need to do is to click on Save from the Sniffer Tool, put a name for the file (I used Sniffed as a name) and click Save. Then the file will appeard in the router File List as the following:

That’s awesome, I see the file inside the File List of the router.
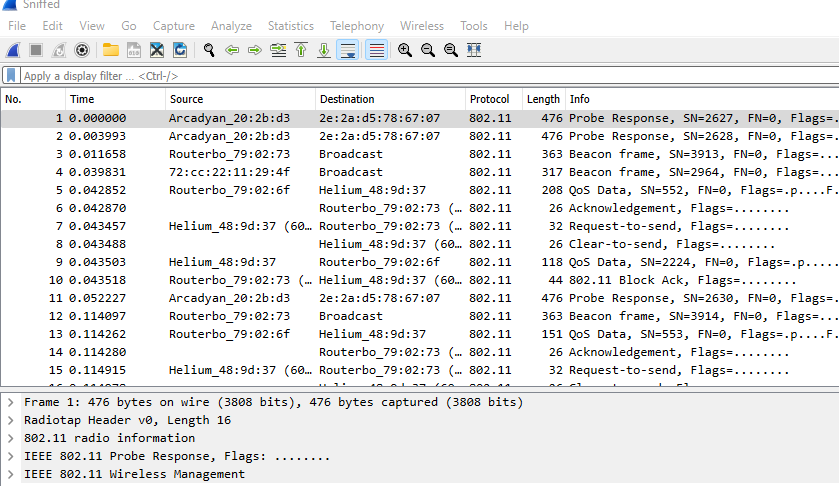
I will open Wireshark software now, and open the Sniffed File inside Wireshark and see if I can see the output. Let’s do that:

Here it is. I see again all those wireless frames that I have captured on the MikroTik router and saved them in the file.
That’s all what I wanted to show you in this lesson, hope you enjoyed it and see you in the upcoming one 🙂

0 Comments