MikroTik DHCP Starvation Attack and Prevention

DHCP Starvation attack is another type of attack that we may face in our network. It is a Layer 2 attack, meaning you do not even need any IP address set between your Kali Linux machine and the MikroTik router to launch this attack.

But what DHCP Starvation attack can do exactly?

As you may know, most of network engineers use a DHCP server in their network to allocate IP addresses to devices in the network. What an attacker will do, he will exhaust our DHCP pool in our MikroTik router in a way that all available IP addressed will be assigned to unreal devices based on Kali Linux requests, and the rest of the real devices in our network will not be able to have IP addresses from the DHCP server anymore. More than this, this attack would cause that the CPU on the router goes to 100% and again the router will not be able to do normal tasks that a normal router should do.

If you want to learn exactly how this would happen in the background, let me then show you this illustration:

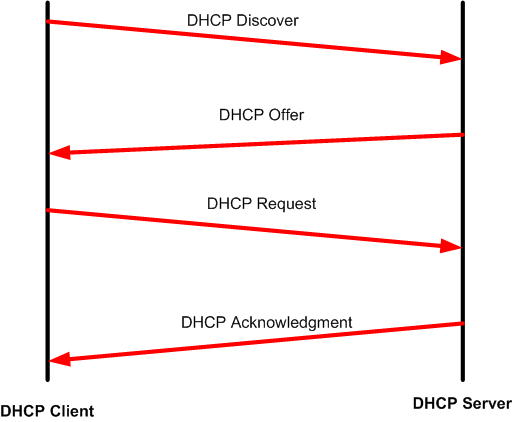
Every DHCP client (PC, laptop, phone, Tablet, printer, etc..) requesting for an IP from the DHCP server will have to pass through 4 DHCP messages so it has an IP leased to it. This is what we call is as DORA where :

  • “D” is Discover sent as a broadcast by the DHCP client seeking a DHCP server in the network.
  • “O” is Offer where the DHCP server replies to the DHCP client and offers an IP.
  • “R” is Request where the DHCP client requests the offered IP to stay for him from the DHCP server.
  • “A” is acknowledgment where the DHCP server acknowledges the DHCP client that the IP is leased for him.

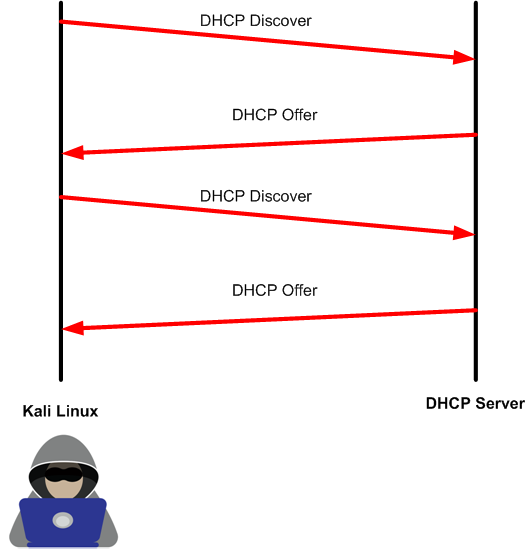
This is all good for now. However, the attacker will use this DORA communication to launch its DHCP starvation attack. What attackers normally do, they launch a continued DHCP Discover to the DHCP server from different “unreal” devices, and the DHCP server will answer by DHCP Offer to each of those requests. The result will be that the DHCP server has offered all his IPs in his pool to fake devices and he won’t be able to server other real devices. Please note that the attackers will not allow the DORA to complete, so they only do discover and wait for an offer to launch again another discover until the pool of IPs is finished.

Now you know the theory behind it, let’s run the attack and see how to mitigate it.

LAB: DHCP Starvation Attack & Prevention


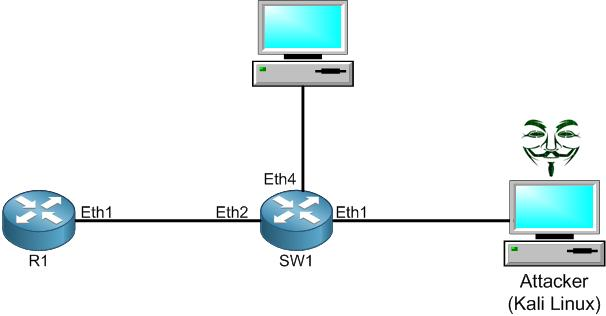
I do have the following scenario. R1 is connected to a switch on its port Ether2, and on this switch we have an attacker who plugged in his Kali Linux machine on the interface Ether1 or the switch. On R1 we have DHCP server enabled providing an IP from the range of 172.80.80.0/24.

The attacker on Kali Linux wishes to run a DHCP Starvation attack so all IPs from the DHCP server pool will be exhausted and the router will not be functional anymore. Let’s try to run the attack and see what will happen to R1.

Again, from Yersinia we can launch the DHCP Starvation attack as you see in the picture above. Let’s see if R1 has all his IPs reserved.


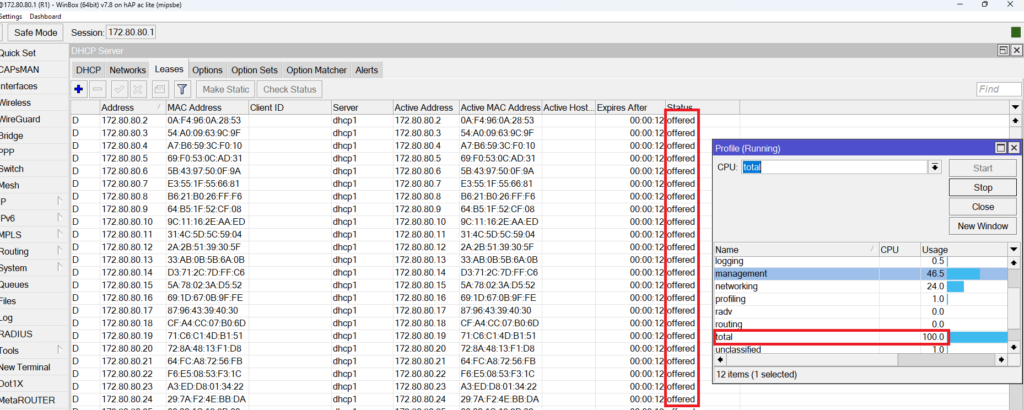
You can clearly see, the IPs from the DHCP pool have been exhausted and all have offered as a status (so DHCP Offer as I have previously explained). Also, you can clearly see that the CPU of the router goes to 100%.

This is a very bad type of attack that we may have. So how can we solve it?

[mepr-show rules=”319″ unauth=”message”]

To solve the problem, we have to think about how the attack happens. As being a Layer 2 attack, that means that the attacker will send from Yersinia many DHCP Discover using 1 MAC address for each, fooling the MikroTik router that those MAC addresses are coming from legitimate devices.

So, what we can do, we can limit the MAC addresses per each port of the switch. In another term, I can say for example that on port Ether4 of the switch, there is a PC connected which has the MAC address D8:5E:D3:A6:7A:2A (that’s my PC MAC address on my NIC). Then in case this MAC address is the one requesting the DHCP Discover, then the switch will allow him to pass to the DHCP server to form the complete DORA communication. In case the request is coming from any other MAC address than the one which I have whitelisted, then the switch will drop it. For this, we require to the configuration from the “Switch” tab on the Switch.

Let’s whitelist the MAC addresses of R1 and my PC and then we say anything else will be dropped on all ports:

This will whitelist the MAC address of R1 (the MAC of R1 is: 08:55:31:47:8B:57

Let’s whitelist the MAC address of my PC:

My PC has a MAC address of D8:5E:D3:A6:7A:2A, so I have whitelisted and put it on the right interface where it is connected (Ether4).

Finally, I have to say anything connected to Ether1 (where Kali Linux is connected) then drop it:

When you check “Set New Dst. Ports” and you do not mention what is the new destination ports, then this will drop the traffic from any other MAC address connected to this port which is not whitelisted.

At the end, I will have the following rules which works in sequence:

Let re-run the DCHP Starvation attack and see if this will abuse the DHCP IP pool on my router:

The attack has started. Let’s see the router now:


I can see clearly that the DHCP starvation attack doesn’t have any more any impact on my router. The DHCP pool IPs are not exhausted (I only see the IP to my legitimate PC connected on Ether4 interface of the switch) and the CPU of the router is quite normal.

But when I look on the switch, I see that the traffic on Ether1 (where Kali Linux is connected) is much higher than the traffic on Ether2 and Ether4 and that’s normal because Kali Linux is sending huge type of broadcast as DHCP Discover out to this interface.

What has been done on the switch is more than enough to mitigate the DHCP Starvation attack, but you can do more if you want.

By default, the switch will lean dynamically the MAC address of any connected host connected to it and put it on inside the “Hosts” table under the bridge:

As you see, all entries have a letter “D”, meaning they are learned Dynamically. We can change this behavior by hardcoding manually the entries that we want the switch to learn as hosts, then he will only serve the entries of the hosts that we will enter manually.

1st let’s add the host entries on the switch manually (the ones we need them to work).

All I had to do was to just double click on the entries that I want to make static from the Hosts then make copy (you can see, the entries do not have any “D” letter behind them). In this way, I have made the 2 entries which are the ones connected to my PC on Ether4 and to R1 on Ether2 as static entries. I can see that there are still other dynamic entries shown, meaning that in case someone runs a Kali Linux DHCP Starvation attack on any other port where we did not make any rule, the Hosts table will be full of entries causing the switch to go down.

Now I want to say to the switch that I do not want him to learn MAC addresses dynamically. Let me show you how to do that:

I have done it on Ether1. You need to go to the port inside the bridge, say learn to be “no” and you can disable “Unknown Unicast Flood”.

I will do the same on Ether2 and Ether4 (you can apply this method to all interfaces in the bridge, but for this LAB I will only do for 3 interfaces).

By doing this, you ensure that your switch will not learn dynamically the MAC addresses of the hosts and he will only serve the hosts which are in his Hosts table on their respective connected interface.

Finally, I would like to share with you the configuration of this LAB on SW1 as a command line so you have it for your reference:

/interface bridge host

add bridge=bridge1 interface=ether2 mac-address=08:55:31:47:8B:57

add bridge=bridge1 interface=ether4 mac-address=D8:5E:D3:A6:7A:2A

/interface bridge port

add bridge=bridge1 interface=ether1 learn=no unknown-unicast-flood=no

add bridge=bridge1 interface=ether2 learn=no unknown-unicast-flood=no

add bridge=bridge1 interface=ether4 learn=no unknown-unicast-flood=no

/interface ethernet switch rule

add ports=ether4 src-mac-address=D8:5E:D3:A6:7A:2A/FF:FF:FF:FF:FF:FF switch=\

 switch1

add ports=ether2 src-mac-address=08:55:31:47:8B:57/FF:FF:FF:FF:FF:FF switch=\

    switch1

add new-dst-ports=”” ports=ether1 switch=switch1

/system identity

set name=SW1

This is all what I wanted to show for this LAB, hope you can apply same settings to your networks or your customer’s one so you can secure them from DHCP Starvation attacks.

[/mepr-show]

0 Comments

Submit a Comment

Your email address will not be published. Required fields are marked *


The reCAPTCHA verification period has expired. Please reload the page.

Please Login to Reply or add a comment!

About