Generally, there are 3 main functions for the firewall:
- Stop unauthorized access
- Block unwanted ports
- Classify and mark connections and packets for QOS or Routing policy
Those firewall functions are applied on the MikroTik RouterOS. For instance, you can use the MikroTik RouterOS firewall to do the following:
- Filter packets using filter rules
- NAT: SRCNAT and DSTNAT to translate source and destination addresses
- Mangle: to mark connections and/or packets
- RAW: drop or bypass packets before reaching the connection tracking
- Service ports: using NAT helpers
- and much more than that.
MikroTik Firewall Chains
When speaking about Firewall in MikroTik, you always have what is called as chain. The chain is used in the firewall so the RouterOS can see on which way does he want to restrict the packets. Maybe I can show some examples of that:
You have 3 chains in the Firewall of MikroTik RouterOS as the following:
- Forward
- Input
- Output
Those can be seen when you create a new filter rule on the firewall as the following:
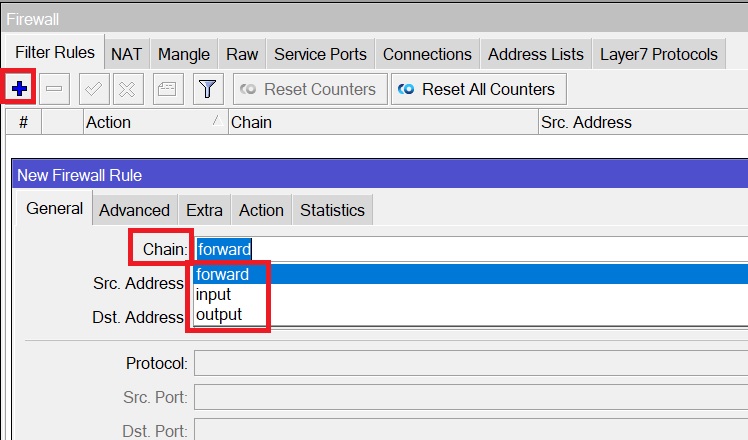
I will explain each one of them.
- Chain Forward: This means that the traffic that is traversing the MikroTik router and going to somewhere else. For example, if you have a PC in the LAN and you want to go to google.com on your browser, then the traffic is sourced from your PC, going via the router to google.com server on the internet. This is what chain forward is.
- Chain Input: This means the traffic that is destinated and terminated to the MikroTik router itself. Think for example when you open Winbox session to the MikroTik router, that’s chain input because the traffic is going to the router itself. Same if you do SSH to the router, or ping to the router. These are all in chain input.
- Chain Output: This belongs to the traffic sourced from the MikroTik router and going to somewhere else. For example, if you do ping from the MikroTik router itself to google.com, that’s fall into the chain output.
So now you know when you want to configure some filter rules, you have an idea which chain should you use based on your scenario.
Firewall Basics
You can create many filter rules in the MikroTik firewall. Those filter rules are processed in order (in sequence). That means that the 1st rule that is matched, then the other rules will not be checked. In case you come from a computer programming background, you know that you have the function of “if, then, else”. That means the 1st programming line is checked, if matched then an action will happen. If not matched, then it will go to the 2nd command and so forth.
Same on MikroTik Firewall, the 1st filter rules is checked, if it matched then it doesn’t go to the 2nd rule. If not matched, then it goes to the 2nd rule. Same happens on the 2nd rule and so forth.
Let’s see this example:
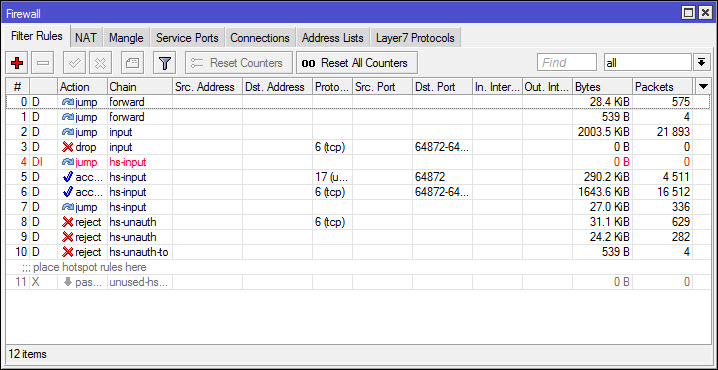
You can see we have 10 filter rules. Once the packet come the MikroTik router, it will check the 1st rule, if matched then it takes the action that this rule is having. If it doesn’t match it goes to the 2nd rule. Then the 2nd rule also will be checked – if it matched then it takes the action that is on this rule, if not it goes to the 3rd rule, and so forth.
Say that all the rules were not matched, then the packet will pass normally. There is no any hidden implicit deny on the MikroTik firewall as on Cisco devices for example. For this reason, it is highly advisable that once you finish all your filter rules, then you can create the last rule to deny everything. This way, you know that in case any traffic is not matched to any of the rules that you have created, then it will be denied.
Firewall Action
When I was speaking about the rules, I was saying that each filter rule has an action assigned to it. MikroTik provide different actions that you can use for your filter rules. Those can be seen here:
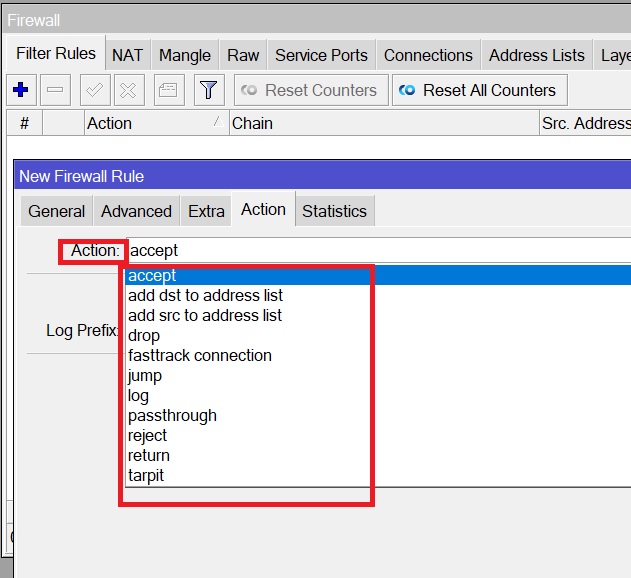
Each of these actions has a function assigned to it.
Let me show you some of them (during the LAB, we will cover most of them):
- Action = allow the packet
- Passthrough = count packets/bytes
- Drop = Discard a packet
- Reject = discard a packet but send ICMP message or TCP reset
- TCP reset kills a TCP connection instantly
- Tarpit = Send ACK Flag but don’t open the connection
- Log = give a log alert on the logging
Enough from theory, let’s do some LABS now ????
0 Comments