MikroTik UDP Flood Attack & Prevention

Similarly to what we have seen when I was speaking about TCP SYN flood attack, the attacker may use the same technique but this time to flood UDP traffic causing the MikroTik router to not be functional anymore.

He will simply create and send a large amount of UDP datagrams from spoofed IPs to target a MikroTik router. When the router receives this type of traffic, it will not be able to process every request and it will consume its bandwidth by sending ICMP “destination unreachable” packets.

In a result, the router will have his CPU going to 100% and the bandwidth on the interface, where the attack is coming, will be used by the traffic of the attack.

But how the attacker can do the attack?

Well, it is same scenario as we have seen on the TCP syn. He will do a reconnaissance attack to see how to target the victim MikroTik router using UDP flood. Once he finds that there is an application open (which uses UDP protocol), then he knows that this device can be attacked on UDP.

This will mean to us, as security engineers, to block on the router any application(s) which work on UDP protocols or at least to make a security setting on the MikroTik router to now allow those applications to be seen by the attackers from the outside.

Enough of theory, let’s do a LAB to see how the attack may happen and how to prevent it.

LAB: UDP Flood Attack & Prevention

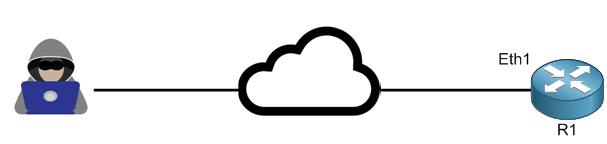
I am on the same scenario. Let’s assume that my MikroTik Router is connected on Ether1 to the internet with a public IP address.

As explained, 1st thing the attacker will check if the router has any application running which use UDP protocol so he knows that he can issue a UDP flood attack. Again, he can use NMAP on Kali Linux to check this:

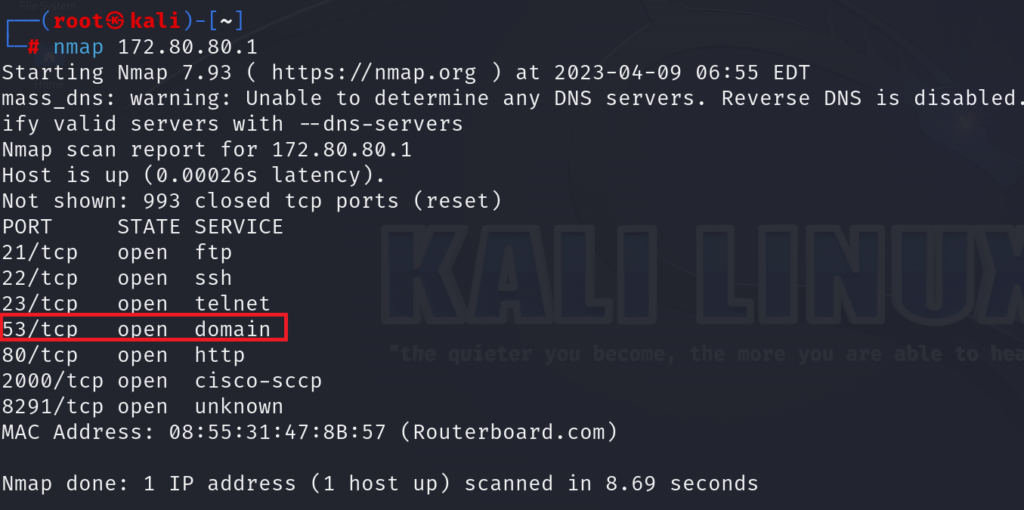
We can see clearly that DNS is open on the MikroTik router. On NMAP it shows that the DNS is using TCP protocol, but we know that DNS works on both protocol TCP and UDP, so here the attacker knows that this router can be attacked by UDP flood.

Let’s issue a UDP flood attack and see its impact on our MikroTik router:

I have used the following command on Kali Linux to run the attack:

hping3 –flood –rand-source –udp -p 53 172.80.80.1

Here is the result of the UDP flood attack:

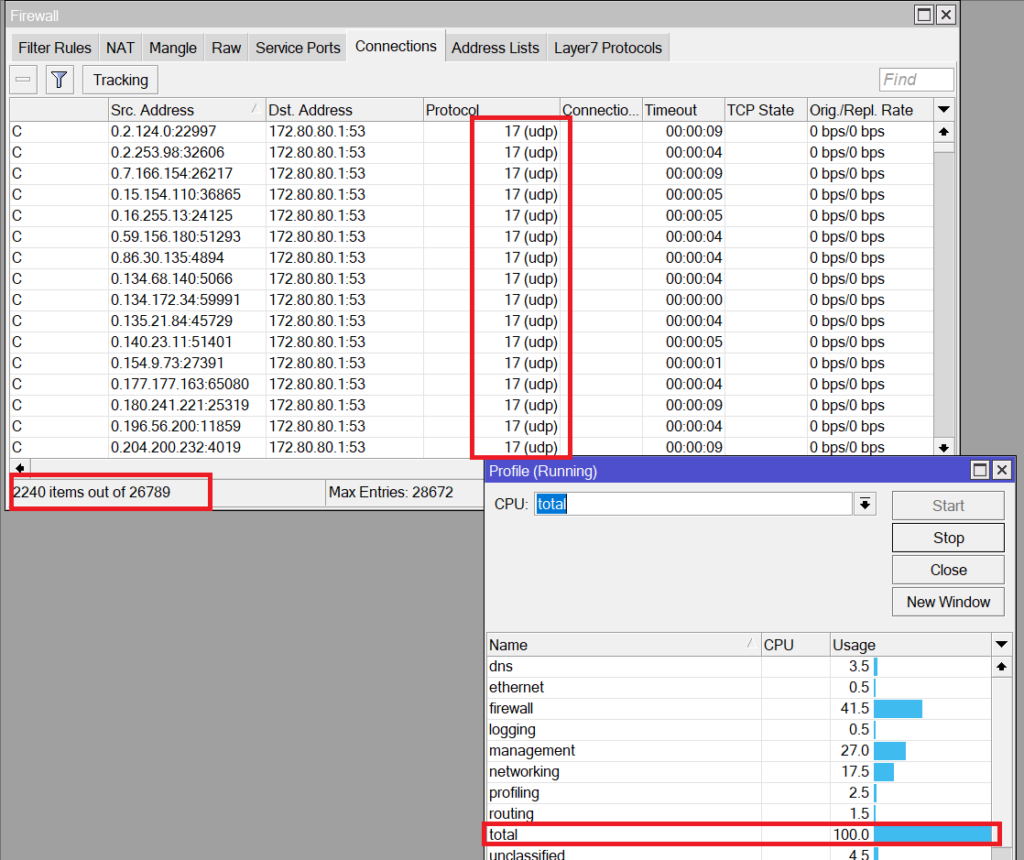
You can clearly see how many UDP connections were open from different sources, and you can see the router CPU going to 100%. This would negatively affect the performance of our MikroTik router.

Now we know how the attack happens, let’s see how to mitigate it.

[mepr-show rules=”319″ unauth=”message”]

1st let’s make it hard for the attacker to guess that we have an application running UDP protocol on our router. This can be done by simply disabling the DNS forwarder on our router.

Let me show you how you can do that:

Very simply, you need to uncheck “Allow Remote Requests”. By doing that, the MikroTik router will not be any more a DNS forwarder to your internal users, but here you have to be careful that you should assign another DNS address to your internal devices so they can work on the internet.

After I have unchecked “Allow Remote Requests”, let see if the attacker can see the DNS port 53 is still open when he does the scan:

I do not see it anymore. Excellent!

Now in some cases, you may need to make your MikroTik router as a DNS forwarder, so the option to disable it is not possible. In this way, you can use the Firewall of the MikroTik to block any DNS requests coming from the outside network (for example the internet) to not use your router as a DNS forwarder and occupy your WAN traffic, while you keep it available to your inside network.

You can do that either from the Filter rules or from Raw firewall.

I will do it from Raw (again, we will speak in detail about Raw firewall later in this book).

Let’s enable DNS forwarder again:

Now I will create a rule on Firewall raw saying that any DNS query coming from my WAN interface (Ether1) will be dropped.

By doing that, you will be sure that your MikroTik router will not be a DNS forwarder for devices outside your network.

Now let’s focus on blocking the UDP flood attack.

As we have done on the TCP SYN attack prevention by limiting the number of packets for second, we have to do the same for the UDP flood attack by this time for the internal DNS queries because we have already blocked any DNS query coming from the outside.

I will create the 1st rule on Raw firewall:

Here I am saying that any DNS traffic coming to any interface to the router, which is not Ether1, let’s see what how we shall continue the rule:

On Extra we said that the limit of DNS queries should be max 105 packets per second. Now we have to say that we wish to accept that:

In a summary, the rule says:

Any DNS query coming from a source to an interface which is not Ether1 on the MikroTik router and has as maximum 105 packets per second, then accept it.

Now we have to do a last rule to say that anything else is to drop:

In a summary, I do have 3 rules now as the following:

  • Rule 0: disallow any DNS queries coming from the WAN to Ether1
  • Rule1: allow DNS queries to come to any interface but Ether1 and are maximum 105 packets per second.
  • Rule2: if Rule 1 is not matched, then drop the packets.

Let’s run the UDP flood attack again. In our case, as the attack is going to come from Ether1, then rule 0 will be applied and it will block all UDP flood. Let’s check:

Indeed, rule 0 was blocking the UDP flood and you can see the Bytes and Packets on that rule were increased.

What about the connections? Do we see UDP connections showing up as we have seen previously when we launched the attack before we made the rules?

No more connections for UDP showing anymore ????

The only thing that I still see is that the CPU on my router is still hitting to 100%, but that’s normal because I am using a HAP AC lite in this LAB which has a very limited CPU resource. Again, in your case, always try to have a big MikroTik router acting as a firewall to avoid heavy CPU usages when the firewall rules are blocking the attacks.

Last thing in this LAB, let me export to you the command that I have used so you can use them yourself:

/ip firewall raw

add action=drop chain=prerouting dst-port=53 in-interface=ether1 protocol=udp

add action=accept chain=prerouting dst-port=53 in-interface=!ether1 limit=100,5:packet protocol=udp

add action=drop chain=prerouting dst-port=53 in-interface=!ether1 protocol=udp

[/mepr-show]

0 Comments

Submit a Comment

Your email address will not be published. Required fields are marked *


The reCAPTCHA verification period has expired. Please reload the page.

Please Login to Reply or add a comment!

About