DHCP means Dynamic Host Configuration Protocol. We use this protocol to provide IP addresses dynamically to network devices.
Imagine you are running a network of 100 PCs. Those PCs (as what we have seen) require having the following information to be connected to the internet:
- IP address
- Subnet mask
- Gateway
- DNS
Imagine that you, as a network engineer, need to go to each PC and assign to it an IP address, a subnet mask, a gateway and a DNS. This takes a lot of time and effort.
Instead of doing that, you can simply configure a DHCP server on LAN interface of the MikroTik router, then the PCs will communicate with the MikroTik router asking for an IP and the router will lease for them the IP and the rest of the information.
This way, the PCs will get a lease automatically without the need for you to go to each PC and assign for them that information.
In addition, the MikroTik RouterOS can be a DHCP client. That means it will get an IP dynamically on its DHCP client interface via a DHCP server. That’s also possible to be configured on the MikroTik RouterOS.
Enough from theory, let’s apply this on a LAB so you can understand it better.
LAB: DHCP Server & DHCP Client

We are back to the initial scenario. At this moment, the MikroTik router doesn’t have any configuration on it because it was erased when we re-flashed the RouterOS from the last LAB. I want now to configure the DHCP Server on the interface Ether2 of the router so the PC can get an IP address automatically.
1st we need to set an IP on the interface Ether2:

I have set an IP of 192.168.88.1/24 on Ether2 interface of the router. Very important that you put an IP on the interface where you want to configure the DHCP server on it because this is going to be the gateway of the network devices that are getting the leased IPs. Also, if you do not set an IP on the interface, then you will not be able to configure the DHCP server.
Now that I have the IP set on the Ether2 interface, we need to configure the DHCP server. Let’s do that:

I selected that the DHCP server should be on the interface Ether2, then click next:
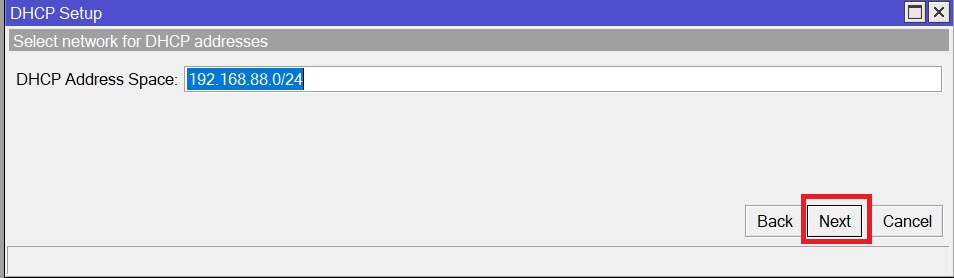
Directly it will take the network ID of the IP that I have on Ether2, then click next:

Now it will show the Gateway IP for the network devices which will get the lease information from the DHCP Server. As I said, the gateway is the IP on Ether2 which is 192.168.88.1.
Let’s click next:
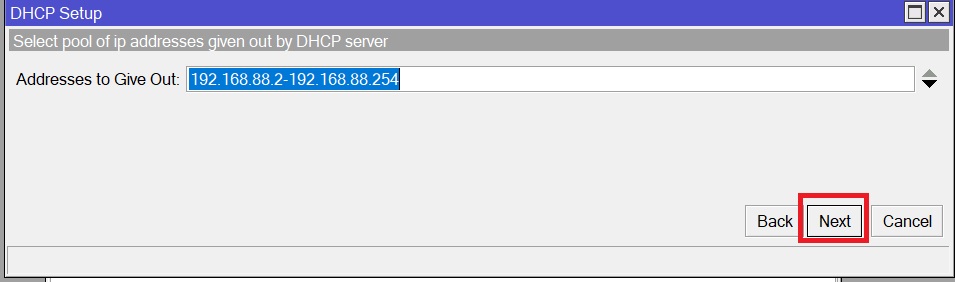
Now it shows the range of IPs that will be leased. You can adjust that if you want to make the range smaller or bigger. But I will leave it as it is and click on next:

Here you can set the DNS IP address(es) that you want to assign to the network devices. I have put 8.8.8.8 and 1.1.1.1
You can put any DNS server(s) that you want. Let’s click on next:

This is the lease time showing how long the lease will stay before it is expired. By default, it is 10 min. You can change that if you want, but I will leave it as default and click next:
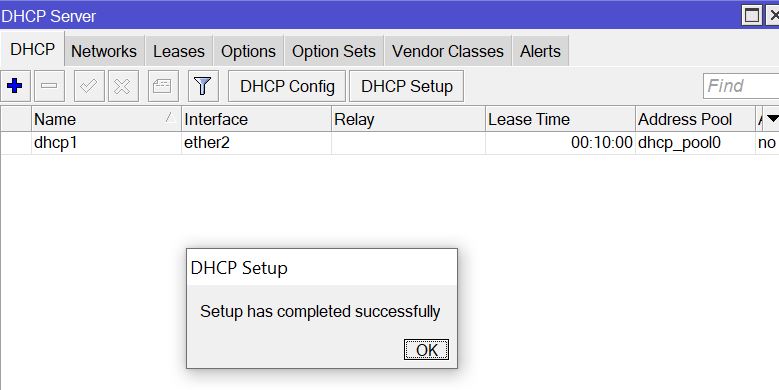
The DHCP server has been completely configured now.
Let’s check now if the PC will get an IP from the pool that I have created on the DHCP server. To do that, we have to say on the Network Interface Card of the PC that it should get an IP address automatically. Let’s do that:

So, my PC will get automatically an IP address, a subnet mask, a gateway and DNS server addresses.
At this moment, the PC will communicate in the background with the MikroTik router asking him to lease for him that information, and the MikroTik router should give the IP & the information he wants. Let’s check if this has worked:

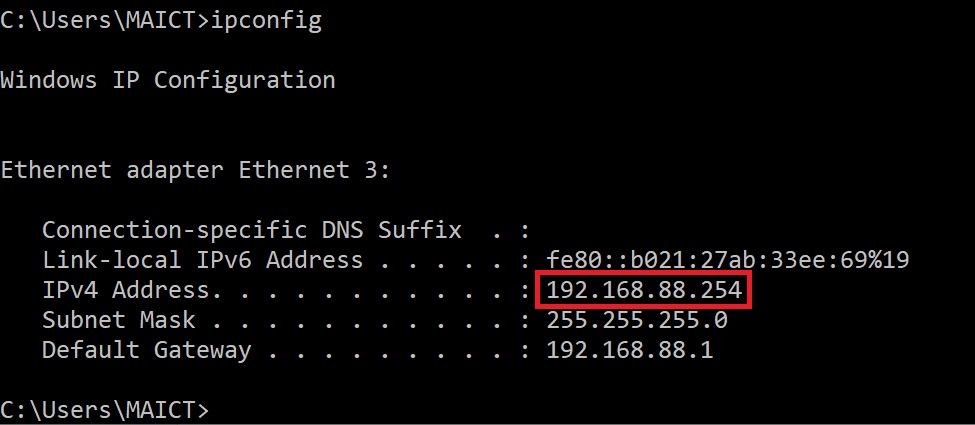
Indeed!!!! My PC got the lease from the MikroTik router. We can justify that also from the MikroTik router as the following:
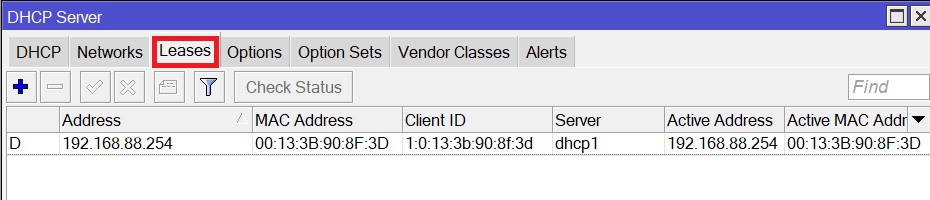
You can see, there is 1 lease and the MikroTik router has given the IP of 192.168.88.254 to the PC. You can clearly see the PC’s MAC address showing up there. All this is happening dynamically without you move from your chair.
Let’s say now that you want this IP to always be given to that PC. Then you can just make this lease static, this way even if the lease is expired then this IP will not be provided to another machine. You got my idea?
Let’s make this lease static now:

This lease has been moved to static now. This means that anytime my PC is powered on, it will always get the IP of 192.168.88.254
Let’s say that I decided that my PC take an IP of 192.168.88.2 – how can I do that?
Let me show you:

All you need to do is to go on the lease entry (which is static) and change the IP there. Does it mean now that the PC has directly the IP of 192.168.88.2? Well not really, you must wait until the lease time is finished then it has the new IP. Otherwise, you can force your PC to re-ask for an IP address. Let’s check what is the IP on my PC now:
It is still 192.168.88.254!!!!
Let’s release the IP on the PC and request for a new IP:

Here we go. The PC has now the IP of 192.168.88.2 – that’s awesome.
The last step of this LAB is to show you how you can enable DHCP client on the MikroTik RouterOS.
As you saw on the graph of the LAB scenario, my router has Ether1 connected to the ISP router which has a DHCP server enabled on it. I need to make Ether1 a DHCP client so my router can get the lease information from the ISP DHCP server router and be able to go to the internet.
Let me show you how you can do that:
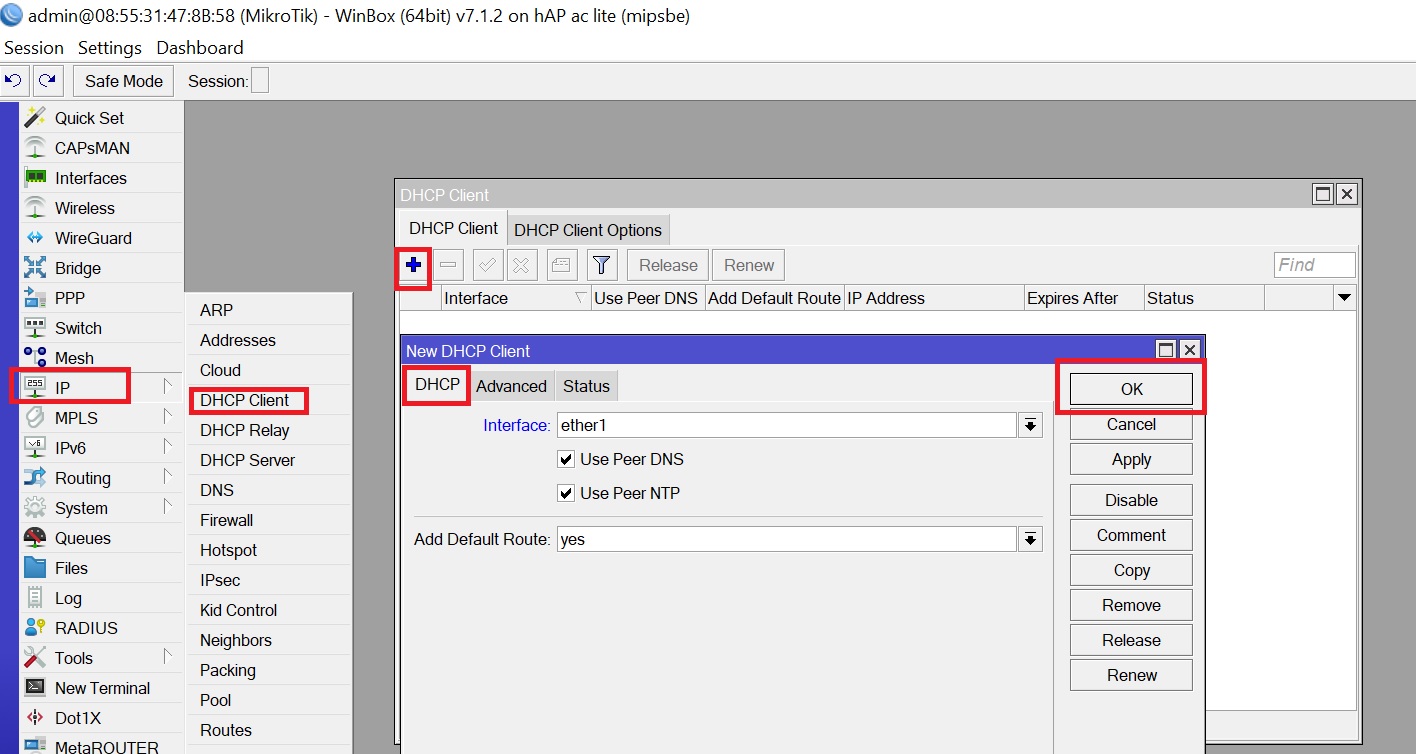
That’s all what you need to do. I have enabled the DHCP client on Ether1 interface of the router and I have asked that I want to get the DNS and NTP server addresses as well as the Gateway (default route) from the ISP router.
Let’s see if my router got all those information:

Indeed, they are all there. Now my router should be able to go to the internet:

It is working.
That’s all what I wanted to show you in this LAB, in the upcoming part of this chapter I will speak about ARP.
0 Comments