How to connect Telnet & SSH to the MikroTik router?

There are other ways to connect to the MikroTik router command line without going to the Winbox and the browser. This can be done via Secure Shell (SSH) and Telnet.

Say that you are in a business trip when suddenly your customer has called you saying that his network is down, and you want to connect remotely to your customer’s router to do troubleshooting using the command line (of course you can connect remotely via Winbox but let’s assume that you only work with the command line or the access to Winbox port is prohibited). Then you can connect to the router via SSH or Telnet.

Both are applications with well-known ports which have a function to access remotely to the networking devices. The difference between SSH and Telnet is that SSH is more secure. Meaning that everything you make as configuration on SSH will be sent encrypted to the router while with Telnet everything is sent as clear text. That’s why I always recommend using SSH in place of Telnet.

Now we understand the difference between SSH and Telnet, let’s apply a LAB to see how we can connect remotely to the router via those 2 applications.

LAB – SSH vs Telnet

We are still in the same LAB scenario. I want to connect to the MikroTik router via SSH and Telnet. To do that, we have to be sure that the ports of those 2 applications are open on the MikroTik router. The ports are:

  • SSH = 22
  • Telnet = 23

Let’s directly check if those ports are opened by default on the MikroTik router.

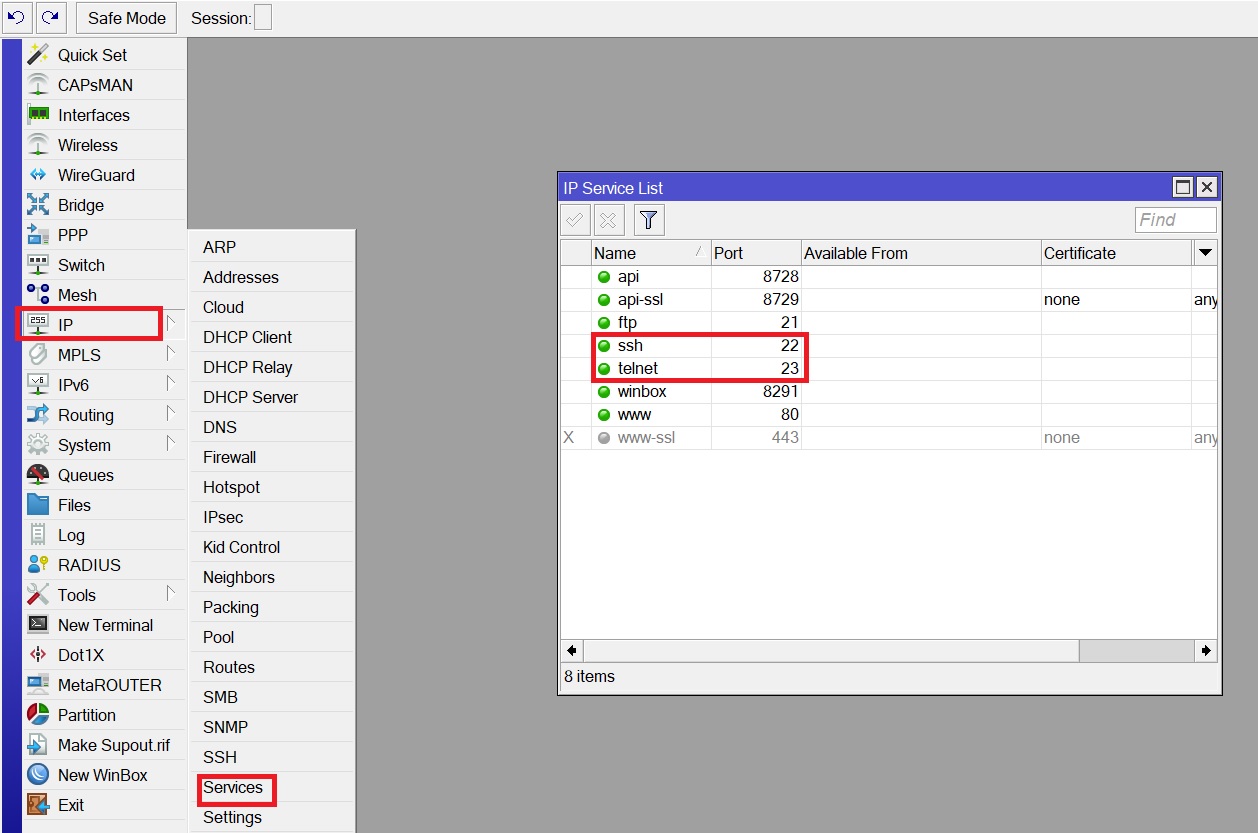
To do that, we have to go to IP then Services, and I can see clearly that SSH and Telnet have both a green color, meaning they are enabled. You can see also their respective ports (22 and 23)

[mepr-show rules=”319″ unauth=”message”]

We know now that SSH and Telnet are enabled on the MikroTik router, we need a utility to use to connect to the router via SSH and telnet. There are different utilities that you can use such as SecureCRT, TerraTerm, etc…. The simplest and free of charge one that we can use is Putty. Let me show you how you can download it.

You just go to putty website and there you can download it.

I advise that you download the standalone client file and not the package file, then you do not need to install the complete software on your PC. This can be seen here:

Now I have putty downloaded, it is on my PC.

Just double click on it, put the router IP on the Hostname, select Telnet and click on Open.

You will be redirected to the command prompt as below:

Login using the admin username and password of the router.

Once done, you see you login into the router command line. Now you can do any configuration you want using the command line.

Let’s change the router name to R2 from the command line and see if this can be applied right away (of course to be able to write command to the router, you should have some knowledge about it, fortunately the MTCNA is based on Winbox and not on the command line).

Once the command has been executed, you can see that the router name has been changed to R2. Same if we look in Winbox, we will see the router name now R2. Let’s check.

You can see indeed that the router name has been changed on Winbox too.

Now we know how to connect via Telnet, let’s try via SSH. We will also be using putty for this.

Same to as what we have done for Telnet, I must put the router IP on the Hostname then choose SSH (the port will be 22 shown directly) and click on Open.

One you click on Open, you will get the follow window:

Please click on Yes here. The router is exchanging some keys with you for the security purpose as SSH is a secure way to connect remotely to the router as I have already explained.

Once done, you will be redirected to the login window (same as Telnet).

Just put the admin username and password again.

Here we are on the router. Excellent!!!

We can see clearly that the router name is R2. Let’s change it now to R1 and see if this can happen.

The router name has been successfully changed to R1. That’s really awesome. No need to check on Winbox because surely the name now is R1.

The last thing that I want to show in this LAB is whether 2 or more people can connect remotely via SSH or Telnet to the router. Say that you are doing a configuration and you were stuck, and you need your colleague to login and assist you. Is this possible? Well surely it is possible.

I still have now the SSH session open. I will login to another SSH session and see if I can have 2 sessions opened simultaneously.

Here are the 2 SSH sessions opened without any issue.

That’s all what I needed to show you in this LAB, now we have to dig more about the command line on MikroTik and how to use it.

[/mepr-show]

0 Comments

Submit a Comment

Your email address will not be published. Required fields are marked *


The reCAPTCHA verification period has expired. Please reload the page.

Please Login to Reply or add a comment!

About