Configuring OSPF Virtual Link in Huawei (transit area)

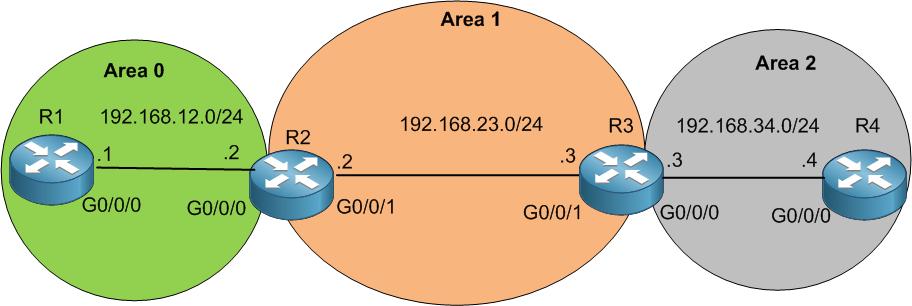
In this LAB, I will show you how you can configure Virtual Link when you have a transit area.

A transit area is like what I have already explained, when you have for example area 2 connected to area 1, then area 1 is called a transit area because it has connectivity with area 0 and area 2 and the virtual link will have to happen in that area.

I have already configured OSPF on all areas, so we focus only on configuring the virtual link. To mention, once you need to configure the virtual link, then you need to use the router ids of the routers that will be forming the virtual link. For this reason, I have already configured the router ids on the routers are the following:

  • R1: 1.1.1.1/24
  • R2: 2.2.2.2/24
  • R3: 3.3.3.3/24
  • R4: 4.4.4.4/24

If we look to the routing table of R4, we will see that he does not see any OSPF route.

[mepr-show rules=”319″ unauth=”message”]

We should not be surprised because we already know the reason: R4 is in area 2 which is not connected to area 0.

Let’s create the virtual link so area 2 can be connected to area 0.

The virtual link should be configured on area 1 which is the transit area, and it has to be configured on the ABR routers (R2 & R3).

We start with R2 then with R3.

I directly got a notification on R3 that the virtual link has been formed successfully:

Let’s check the Virtual link status on R2 and on R3.

I can conclude that the virtual link is formed and working properly. Let’s check if R4 can see now the OSPF routes (remember before it was not able to see any OSPF route).

Indeed!!! R4 has received the OSPF routes from area 0 and area 1. So, our mission is well done.

1 more thing I can do in this LAB, is to configure authentication in the virtual link so we have more security.

Let me show you how this can be done.

You can see that I can use different type of authentication. I will use for this LAB MD5 option. Once I put the password for the virtual link on R2, then directly the virtual link will go down until you put the same password and same authentication type of R3 side.

You see, once I put an MD5 password on the virtual link on R2, then directly the virtual link went down.

Let me put the same password on R3 side and see if it will come up again.

Once I have put the same password on R3’s virtual link, it came up again.

This LAB is finished, I still have 1 more LAB to show you in this chapter then we are done ????

[/mepr-show]

0 Comments

Submit a Comment

Your email address will not be published. Required fields are marked *


The reCAPTCHA verification period has expired. Please reload the page.

Please Login to Reply or add a comment!

About