LAB: OSPF Default Route Advertise on Huawei

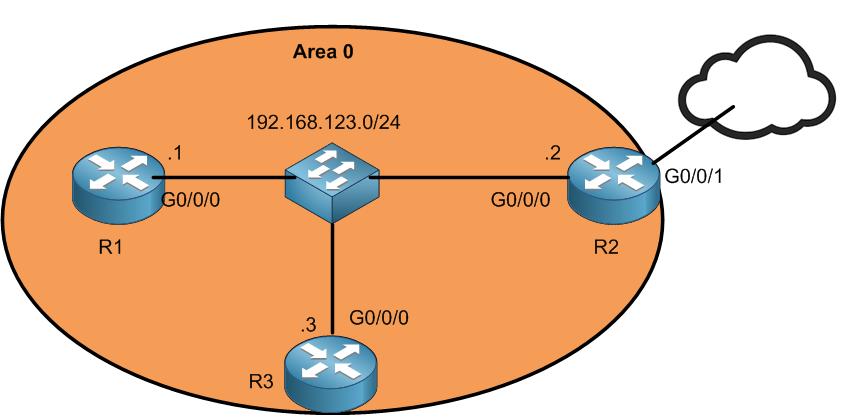
I have already put the IP addresses and configured the OSPF between all routers, and they are forming neighborship.

Let’s enable DHCP client on R2 on the interface G0/0/1 and check if R2 has internet service working on it.

First we need to enable the DHCP process on R2 as following:

[mepr-show rules=”319″ unauth=”message”]

Now that the DHCP process is enabled on R2, let’s enable the DHCP client on the interface G0/0/1 in order to receive an IP address from our ISP router.

Let’s check if R2 interface G0/0/1 has received an IP address from the ISP DHCP server.

Yes, it has received an IP of 192.168.137.196/24. Also it has received a default route as following:

Now, do you think that R2 can go to the internet? Let’s ping google DNS which has an IP of 8.8.8.8.

Indeed, R2 is connected to the internet. But R1 and R3 aren’t connected yet to the internet and I want them to go to the internet also. If you want , I can show you that pinging 8.8.8.8 from R1 will give a failure.

And that’s because R1 (as well as R3) doesn’t have a default route in its routing table.

Now my mission is to advertise a default route from R2 (which is the ASBR) to all other routers telling them that in case you want to go to the internet then you have to go via R2.

As we do have OSPF already configured, we can run 1 command on the ASBR and R1 as well as R3 will receive a default route on OSPF.

Let me show you how you can do that.

I have used “always” after the command so the default route is always inserted to the routers in the OSPF network pointing to the ASBR (R2) as their gateway.

Let’s check if R1 has default a default route on OSPF.

Indeed, R1 has received a default route from OSPF pointing to R2 which has a next hop of 192.168.132.2

Let’s check also R3 if it has received it.

Also R3 has received the default route from OSPF. Excellent.

Let’s check now whether R1 can go to the internet. I will ping again google public DNS 8.8.8.8 from R1.

Oupssss!!!! R1 cannot still go to the internet. But how come? He has a default route pointing to R2.

Well think of it. R1 has an IP address from the range of 192.168.123.0/24. And R2 interface which is connected to the ISP has received an IP of 192.168.137.0/24. So those are 2 different network IDs’, and for this we require to configure Network Address Translation (NAT) to allow the internal IP’s to be translated so they can go to the internet. I will be configuring Easy IP so internal IP’s will be translated to the IP of the outside interface of R2. Got it?

Let’s configure Easy IP on R2.

I have created an access list to classify the IP’s of the subnet 192.168.123.0 (which is my internet IP’s) and I have allowed them to pass.

Now I need to apply the NAT on the outbound of the interface G0/0/1 for this ACL.

I have said to R2 that the NAT will happen on the outside interface G0/0/1 the way out for all IP’s which are classified in the ACL 2000. This way, any IP from the range of 192.168.123.0/24 will be natted and be able to go to the internet.

That’s all what I need to do for the NAT.

Let’s check now if R1 is able to ping 8.8.8.8.

Here we go. R1 is able to go now to the internet.

Let’s check also if R3 can also go to the internet by pinging google IP DNS too.

Super!!!! R3 is also able to go to the internet.

So, the mission of this LAB is done and the chapter is finished. Hope you enjoyed it and see you in the upcoming one.

[/mepr-show]

0 Comments

Submit a Comment

Your email address will not be published. Required fields are marked *


The reCAPTCHA verification period has expired. Please reload the page.

Please Login to Reply or add a comment!

About