Understand and configure the MAC Based VLAN on the MikroTik Switches

All that we have seen up to now has been based on the port-based VLAN, which is a very common one. But also, on the CRS3xx series, you can use MAC-Based VLAN.

What is exactly the MAC Based VLAN? The concept is very easy; each network device has a MAC address on its network interface card which is unique. What we can do, we can configure the switch in a way that each MAC address will belong to a particular VLAN. That means in case my PC is on VLAN 10, if I connect my PC to anywhere in the network then I will also remain on VLAN 10. That makes things much easier for many network administrators.

Enough from theory, let’s see how we can apply this on a LAB. I have already wiped out all configurations on my switches.

LAB: MAC-Based VLAN

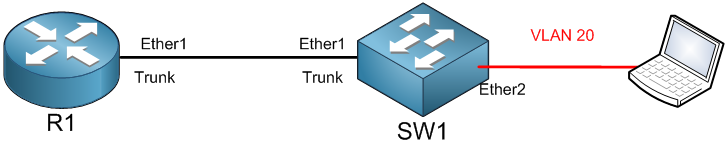
I have the following LAB. I have R1 connected to SW1 on the interface Ether1, and on the other hand, I have connected my PC to the interface Ether2 of SW1.

I am going to create a VLAN20 interface on R1, where I will enable the DCHP server on it, then on SW1, I will have to make Ether1 as a Trunk port and assign the MAC address of the PC to be on VLAN 20. Then I need to see if the PC will get an IP address from the DHCP server.

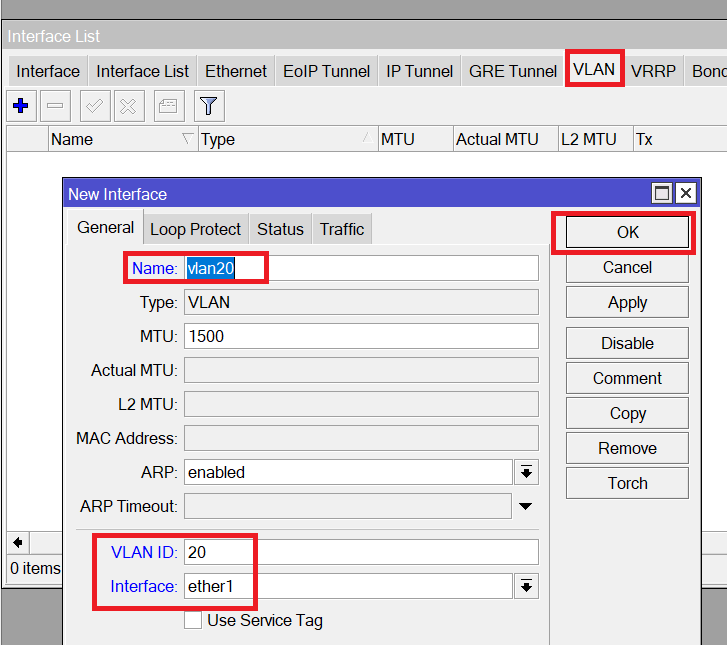
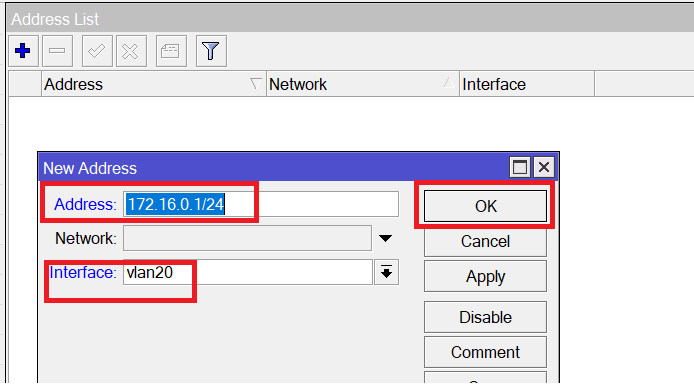
Let’s start the work on R1. I will create the VLAN under Ether1 and assign it an IP address:

[mepr-show rules=”319″ unauth=”message”]

Now I will create the DCHP Server under the interface VLAN20 on R1

Now R1 is ready. We have created the VLAN 20, we assigned it an IP address and a DHCP server.

Let’s go to SW1 and configure it now for the MAC-Based VLAN.

First, we need to create the bridge interface, then add Ether1 and Ether2 as well as Ether3 to the bridge (I need Ether3 for testing).

Be sure that Hardware Offload is checked when adding the ports to the bridge.

Now you need to add the VLAN’s which we only have one for this LAB (VLAN 20). You need to make Ether1 as a trunk port and access the interface Ether2 and Ether3. Also, I will create VLAN 30 and make it a trunk port on Ether1 and access on Ether2 and Ether3. Then I will create a rule on the Switch saying that any traffic coming from the MAC address from my PC will go to VLAN 20 and not to VLAN 30. This way we should receive an IP address from the DHCP server that we have set on VLAN 20 of R1.

Let’s do that.

Excellent. So now on Ether2 and Ether3 of SW1there is VLAN 20 and VLAN 30. How does the switch now need to understand that in case my PC is connected to Ether2 or Ether3, he should put it on VLAN 20 and not VLAN 30 to be able to receive an IP from the DHCP server? That’s what should be done with the MAC address of my PC. Let’s first get the MAC to address on my PC interface card.

Okay, this is my NIC MAC address on my PC. Now we need to go to SW1 and on the Switch Tab we should create 2 rules to say that in case my PC is connected to Ether2 or Ether3, then it should go to VLAN 20. Let me show you where the Switch Tab on Winbox is.

Let’s create the rules from the Switch Tab:

So, in this rule, I am saying that if the switch sees traffic coming on the Ether2 or Ether3 interface from the MAC address of my PC, then put it on VLAN 20.

That’s it. Now do not forget to enable VLAN filtering on the bridge interface so the VLAN process will work on the Switch

I will connect my PC to the interface Ether2 and check if it will receive an IP from the DHCP server on R1.

Indeed, it has received an IP from the DHCP Server, so that means this PC is now on VLAN 20. Excellent!!!! Let me try to put the cable to Ether3 to see if it will also receive an IP address from the DHCP server.

As you can see, I have released the IP and renew it after I connect my PC to Ether3, and indeed it is receiving an IP address from R1 DHCP server which is on VLAN 20. That’s amazing.

This is how you can use MAC Based VLAN on MikroTik CRS3xx Switches.

[/mepr-show]

Course Content

0 Comments

Submit a Comment

Your email address will not be published. Required fields are marked *


The reCAPTCHA verification period has expired. Please reload the page.

About